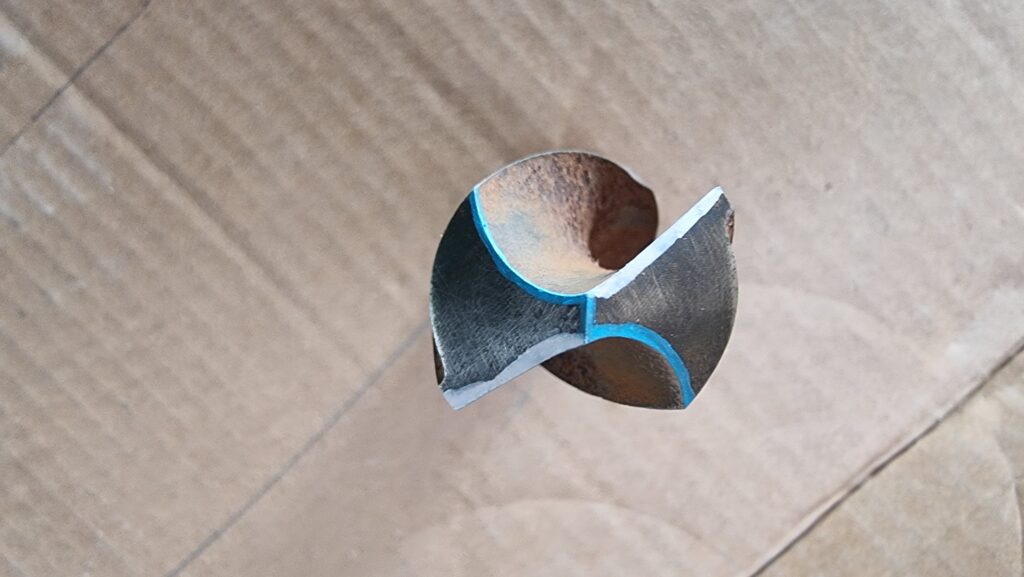
Anatomy of a drill bit
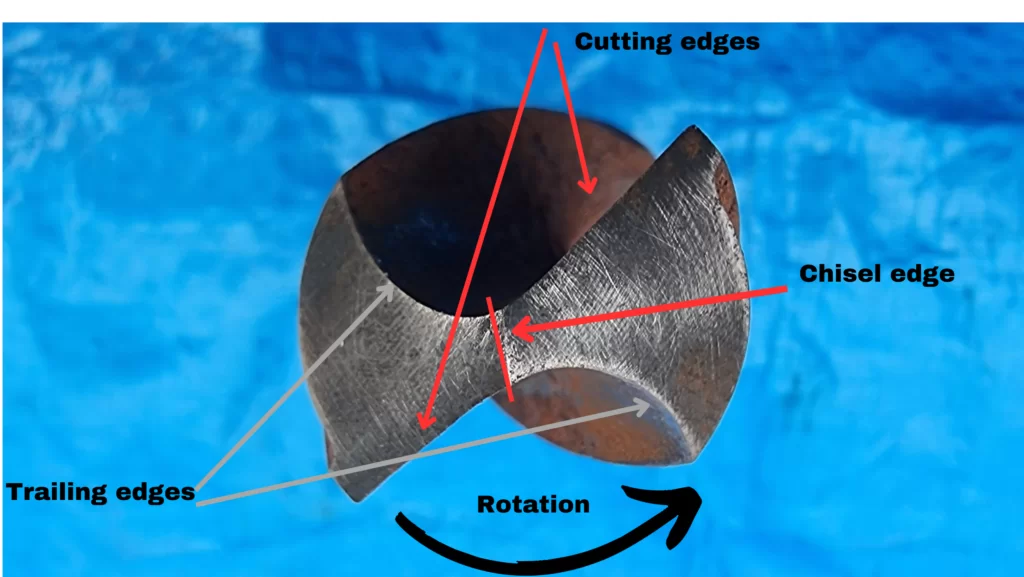
- Cutting edge –with drill pointing away from you, cutting edge is on the left and is straight and angled at about 60 degrees from the long axis of the side of the bit or 120 degrees off the long axis from the point.
- Trailing edge – Is on the right and is curved
- Chisel edge (jumper) is in the centre between the 2 flutes spaning the core of the drill bit
- Drill diameter determines thickness of core and hence length of the chisel edge
- Two helical flutes run the length of the cutting part of the drill and they are separated in the middle by the core of the drill.
- Working face is on the business end of the drill bit and takes the shape of a segment of a circle bounded by the cutting edge in front, the trailing edge behind, the chisel edge in the middle and the curved shoulder of the bit on the outside. The working face should either be flat all slightly convex, never concave.
- Point angle – is the angle made by the 2 cutting edges and should be about 120 degrees off the long axis for efficient cutting. Each of the flanks makes about a 60 degree angle with the long axis.
- Relief angle – This is the difference in height between the cutting edge and the trailing edge Of a work face. The cutting edge is usually about 10 degrees In advance of the trailing edge . The relief angle controls the thickness of cut in each revolution of the drill if it is too steep the drill will become aggressive taking thick cuts and be difficult to control. If the relief angle is too shallow then the drill will only take will only be able to take very thin cuts which may cause overheating at the work face.
- The angles on the cutting surface of the drill not critical and one can get away with approximate angles but if you very too far from the recommended 60 degree cutting edge and 10 degree relief angle the drill may behave badly . See troubleshooting .
Sharpening the drill bit
- Dress the grinding wheel to make sure that the working surface is flat and parallel to the guard or stage .
- Set the grindstone stage about a millimetre or less from the wheel . This is for safety so that nothing gets pulled in between the grindstone and the stage . Also for safety do not wake loves or any loose clothing around a grindstone especially not a tie unless you want your face pulled up against the grindstone . Also always wear safety glasses when using a grindstone as bits of the wheel or bits of steel can come flying wolf and cause injury . Make sure the stage is set above the midpoint Or spinning axis of the wheel. Grinding Should always be done above the midline of the wheel for safety becausr above the midline the wheel will push you away and below the wood midline the wheel will suck you in .
- Draw a series of parallel lines on the stage about 60 degrees off the working face of the wheel . This will help you to keep your drill bit at the correct angle to the wheel while sharpening .
- Line up your drill bit parallel to one of the lines you’ve drawn on the stage put the cutting edge on one side horizontal and lower the Shank of the drill below the cutting edge by about 10 degrees . Now start by dressing the cutting edge first with gentle pressure on the wheel once the cutting edge has been dressed then sweep up keeping the cutting edge horizontal And keep your sweep vertical don’t slew off one side or the other of the wheel . Because you’re working above the centre of the wheel it will ensure that the cutting edge will be your leading edge And the working face will taper away to the trailing edge At a relief angle of about 10 degrees . It is necessary to sweep up with the sharpening motion so that we don’t get a concave working surface due to the shape of the grinding wheel. When sharpening small diameter drills say about four millimetres or less it is not necessary to sweep up and one can just place the drill against the wheel keeping be cutting edge horizontal and dropping the Shank about 10 degrees and just pressing it against the face of the grinding wheel. Now flip the drill bit through 180 degrees and dress the other side try and keep everything the same as the first side because it’s imperative that you two working faces are identical Mirror images of each other .
- It is imperative that both working faces of the drill bit or identical and that they meet in the centre of the drill bit.
- Drill bits are made from harden steel so it is imperative to not overheat them when you sharpening them . Use water as cooling for sharpening, This is probably not necessary if you just touching up.
- A large area working face on a wide bore drill bit may cause drag and some friction when drilling some technicians prefer to reduce the size of the working face by grinding a 45 degree slope on the trailing edge thus reducing the width of the working face and this is supposed to make the drill more efficient and put less strain on the drill and drill bit itself. It also reduces the length of the chisel edge by converting some of the chisel into a type of cutting edge thus assisting with penetration of the metal surface.
Drilling tips (metal)
- Using a lubricant such as oil (or wax) when drilling helps to prevent overheating of the drill bit and this is particularly important when drilling through thick metal and when using a wide board drill.
- Use a centre punch for narrow drill bits to keep them located on the point where you want to drill and use a pilot hole for wide bore drill bits (+8mm) so that the chisel edge doesn’t prevent the cutting edge from engaging the metal . Select a pilot drill bit a little bit wider than the chisel edge length usually about 1/3 t0 ½ of the final drill diameter .
- If you’re not using a pilot hole then you’ll need to apply heavy pressure when you start drilling to penetrate the metal with the chisel age which is notoriously blunt and then once you see filings starting to appear on the surface of the metal then slack off the pressure and continue with light pressure .
- Start With heavy downward pressure on the drill To help the chisel edge penetrate the metal and allow the cutting edge to engage and then slack off as you penetrate the metal in other words start heavy and end light. When the drill breaks through the other end of the material the drill often jams so at this point provide very very light pressure. Control the pressure of drilling by watching the filings being produced at the drilling surface if you’re producing chips of burnt metal and the drill is shuttering it could be that you’re pressing too hard so slack off . The drill should travel smoothly through the metal producing flakes or spirals of metal from the cutting edge of the drill.
- When drilling soft materials like wood there may be some advantage in having a sharper point angle. The point of the drill can then be sunk into the wood before drilling and this can act as a guide to keep the drill running true . This is not a good idea for metal because the point will not have a cutting edge and will not penetrate the metal easily Therefore the cutting edges will not engage the metal without a pilot hole .
Troubleshooting
- Drill bit not cutting into the material and getting hot causing smoke . Possible cause blunt drill bit or trailing edge in advance of cutting edge keeping cutting edge off the work surface .
- Drill bit not staying central And wondering over the surface of the material being drilled and drill bit and oscillating from side to side . This could be because the two working faces are not identical and the point of the drill is not central . This may also cause the hole to be elliptical or not circular .
- Drill bit struggling to get started on the surface of the material . Possible cause is that the drill bit is too wide a diameter and requires a pilot hole Or drill is blunt or sharpened incorrectly .
- Drill bit is stuttering and vibrating during drilling creating large burnt chips of metal . Possible causes of this include too much pressure when drilling and or to steep a relief angle causing the cutting edge to bite deeply into the metal . Soft drilling pressure may help to relieve this problem.
- The final drill hole should be very neat and perfectly circular if not it could mean that the drill has not been sharpened symmetrically or too much pressure was applied or relief angle maybe too shallow causing the drill to vibrate.
Here are some time stamps for browsing the content of this video:
00:00 Beginning
01:45 Twist drill design features relevant to sharpening
01:57 Twist drill cutting edge, trailing edge and chisel edge
02:51 Pilot hole for twist drill
03:29 Twist drill sharpening, point angle
04:14 Twist drill cutting edge sharpening
04:34 How a twist drill functions
05:12 Twist drill relief angle sharpening
06:45 Setting up grinding wheel for twist drill sharpening
08:21 Dressing a grinding wheel for drill bit sharpening
08:55 Aligning the drill bit to the grinding wheel for sharpening
11:50 Twist drill sharpening demonstration
15:20 Tips on drilling through metal with a twist drill
18:55 Trouble shooting twist drill bit sharpening problems
Here is a link to the Video demonstration:
Comments are most welcome, if you decide to try this please send us some feedback☺️ Why not visit our channel and browse through our other videos? http://www.youtube.com/c/AnnErasmus
Here are some more DIY videos:
Short Disclaimer/disclosure: My videos/articles are for informational and educational purposes only, you should consult with a professional before attempting anything seen or done in my videos/articles. Please read full disclaimer here: https://basiclowdown.com/category/disclaimer-disclosure/