Ikea flat pack assembly beginner’s tutorial
In this video tutorial I am going to run through how to go about assembling an Ikea Metod kitchen cabinet flat pack. Ikea flat packs come with a very good set of instructions so if you follow those you are usually OK. However there are a few tips and tricks that I will share today that may help to make the job go efficiently and avoid some of the common pitfalls.
We are about to build a little utility area to transition between kitchen, dinning and living areas with a couple of base cabinets with about a 40cm gap between them so that it can be used to sit at and look of recipes on a laptop or tablet. Then at the top will be 2 eyelevel cabinets with shelves in between for recipe and other books and ornaments. Near the end of the video I will show you a how to set the hanging rail height so that the plinth fits perfectly without any trimming. You may also want watch the other videos on Ikea kitchen design and installation, here are links to the playlists:
https://www.youtube.com/watch?v=11zEqWl77ik&list=PLFEeyzc1BStxaOgRB6_CyR0vpFa1R8edy
https://www.youtube.com/watch?v=iHbShdPLu1g&list=PLFEeyzc1BStxn6PMgPuzHUwrcigiOiNWK
The YouTube video can be accessed here:
Here are the key moments in the video:
00:00 Beginning
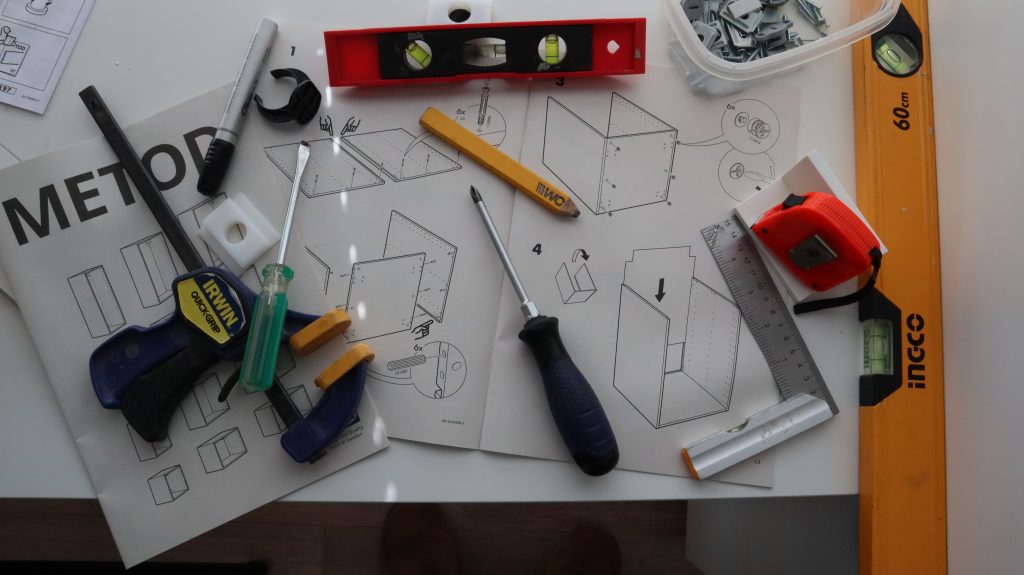
01:57 Tools for assembling Ikea flat pack cabinet
02:54 Quick method to open the Ikea cabinet box
04:17 How to assemble Ikea Metod flat pack kitchen cabinet
06:35 How to use an electric drill screw driver
12:17 How to square the Ikea cabinet before nailing the backing on
15:49 Alternative method to set Ikea cabinet wall rail height
16:15 How to ensure enough space to fit Ikea plinth to cabinets
20:03 How to attach hinges and hang the Ikea cabinet doors
20:43 How Ikea hinges work
24: 43 Future Ikea video contents
Below is the transcript of the video:
So let’s get started assembling a base cabinet.
- If it is a small cabinet like this I prefer to work on a raised surface, like this, to avoid strain on the old body.
- Split the seams of the box with spatula, it’s quicker, easier and less likely to end up with an injury.
- Turn the box over before opening because instruction manual is usually on the upper surface. Ann taught me that, thanks Ann.
- Find the bag with all the bits and pieces. Open it and turn the contents into something like this clear plastic food container. This keeps them all together, so less likely to lose something and it allows quick and easy access.
- Open the instructions and follow them carefully. Don’t be tempted to get ahead of yourself and take a short cut because very often that leads to back tracking and having to undo stuff. That’s another thing Ann taught me. We find it best to work as a team of 2, Ann’s in charge of instructions and finding the bits in the plastic tub and placing them in the correct holes and I come behind with the tools and secure stuff. I find one of these battery drills with a torque setting invaluable but a hand screwdriver is fine, it takes a bit longer. But be careful it is easy to strip a screw in the wood with one of these if the torque setting is too high and that is a headache. This video may be of help in that regard. Also make sure that your screwdriver bit is of the appropriate size and shape for the screws you are dealing with, the bit should fit snugly in the screws slots if not you could damage the screw head which is also a headache because Ikea only provide the exact number of screws needed.
- Now it’s a matter of following the instructions carefully.
- These little cams replace the glue and clamps in conventional cabinet making, the tapering jaws engage the head of the metal dowel and as you turn it clockwise it pulls the 2 boards together, make sure there is no gap when tight. The wooden dowels are just there to line up the boards and guide then into place. And because the boards have been machined neat and square the joint should be pretty square. I will talk more about that in a moment.
- Now its time to nail the backing on. 2 tips here; firstly don’t nail it on back to front (I’ve done that and it made me sad) remember the painted side faces inside the cabinet. Secondly make sure that the corners of the cabinet are square before nailing, the backing is what holds the cabinet in shape. If you nail it on and the cabinet is out of square then you will have problems when you want to join cabinets together and when you want to level a group of joined cabinets. I will just show you what I mean with this little model. A word about nailing the back on. The backing board is pretty flimsy so don’t place the nail too close to edge also the is not much of the cabinet side board on the inside and it is easy for the nail to come out the side as you hammer it so what I do is angle the nail ever so slightly towards the outside because I have more wood to nail into there.
- I prefer to put the drawer rails (or door hinge mechanisms on while I have good access here on the table. You can do it after hanging the cabinets but it puts more strain on the old body, but if you are good at yoga be my guest.
- In this case it is drawers but the eyelevel cabinets will have doors. Now putting the rails on can be laborious. They are fixed with screws in these pre drilled holes, the manual will tell you precisely which holes to use. The best way that I have found to do it is, from the manual, identify and mark the centre holes in the cabinet, don’t’ worry about the outer holes. Then put a screw in the corresponding hole in the rail as shown in the manual. Then engage you screwdriver bit and put screw in its hole and screw to a low torque then with a spirit level rotate the rail until more or less level then the other holes should line up unless your work surface is way off level.
- The hinges for doors on the top cupboards are very nifty, this piece is attached cabinet, the manual will indicate exactly which holes to use and this piece is attached to the door. Before I attach them I’ll just show you how they work which makes it so easy to attach the door to the cabinet. They just click together like this. But are 2 tips be sure to attached them the right way around to the cabinet or you could spend all day wandering why they are not clicking together, I’ve done that. And make sure it is seated flush with the side of the cabinet before you tighten the screw.
- Ann is now going to run us assembling a drawer, these Ikea drawers are really cool just watch.
- Now it is just a matter of putting up the rails and hanging the cabinets, This video shows you how to do all that but I promised to show you an alternative way to set the rail height on the base cabinets which ensures that the plinth just clips on without trimming which can be a headache if the floor is a bit uneven.
- Now I said I would talk about another way to set the height of the hanging rail that will make fitting the plinth a lot easier, especially if the floor is a bit uneven like this one we have here. Put the legs on the cabinets and set their length to about 2mm longer than the height of the plinth. Place the cabinets against the wall, more or less in position, then hook the rail onto the cabinets and mark the top of the rail on the wall in the centre. Put a spirit level on that mark and draw a level line and then attach the rail to the wall using that line for the top of the rail.
- In the next video I will show you the finished product and show you how to fit the drawers and doors to the cabinets and how to adjust them so the they are all level with uniform gaps
If you found this useful, please like and share this video and subscribe to the channel if you have not already done so, thank you very much for watching.
Here are some more IKEA videos that may be of interest:
Comments are most welcome, if you decide to try this please send us some feedback☺️ Why not visit our channel and browse through our other videos? http://www.youtube.com/c/AnnErasmus
Short Disclaimer/disclosure: My videos/articles are for informational and educational purposes only, you should consult with a professional before attempting anything seen or done in my videos/articles. Please read full disclaimer here: https://basiclowdown.com/disclaimer-disclosure-page/