This is how I go about aligning Ikea kitchen cabinet doors
This is another in our series on how to assemble and fit a DIY Ikea kitchen, today I will be talking about adding the final touches by adjusting and aligning kitchen cabinet doors and drawers. This is the link to the full series: https://www.youtube.com/playlist?list=PLFEeyzc1BStxaOgRB6_CyR0vpFa1R8edy )
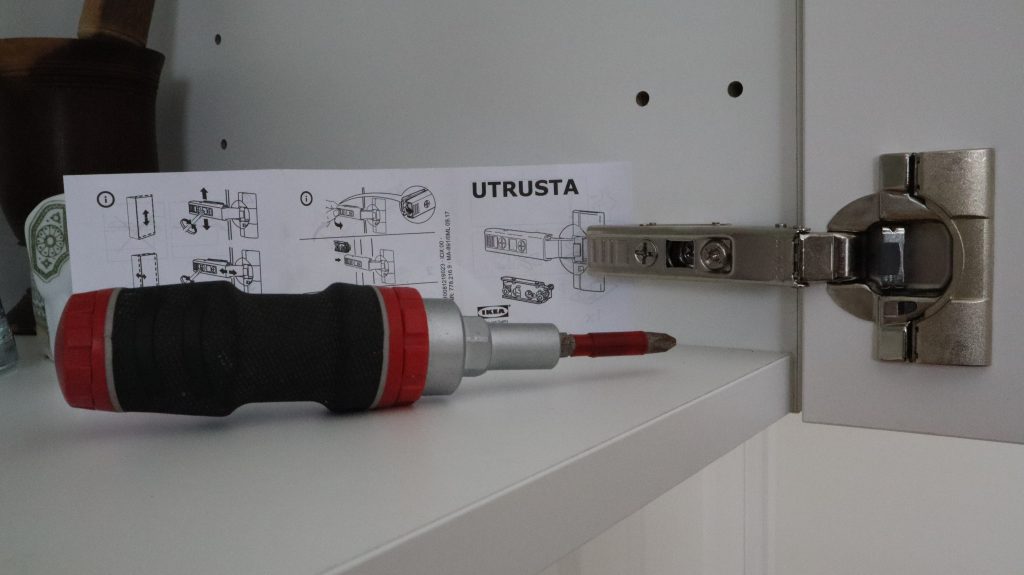
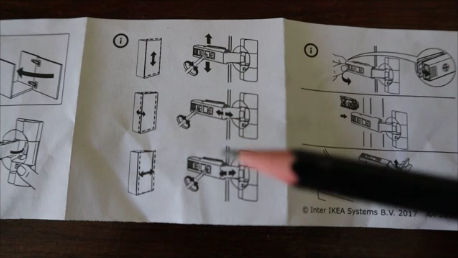
Adjusting and aligning Ikea cabinet draws and doors can be very quick and easy or very frustrating and time consuming. Here are some tips to help make the job go smoothly and to avoid some frustrating pitfalls. The first tip is obviously to read the instructions very carefully but all that usually tells you is which screw to adjust to move the door or drawer in a certain direction and gives little information on how to correct a certain situation. So I will take you through how I go about these adjustments step by step to try and avoid pitfalls. Firstly let’s talk about adjusting cabinet doors. There are various hinge types but they all have similar adjustment screws (which you get from the instructions) these are Utrusta hinges and there are 2 per door.
The only tool needed is a Phillips head screwdriver. There are 3 adjustment screws per hinge, one for each plane of movement. The direction of movement in each plane will depend on whether the screw is turned clockwise or counter-clockwise. I find it easiest just to watch which way the hinge moves when I turn the screw one way or the other.

The first screw (from the outside ) moves the door left and right in the horizontal plane. If you only adjust 1 hinge then the door will tip or pivot about the other hinge so you need to decide whether you need to adjust both or just one hinge depending on the specific situation.
The middle screw will move the door up and down in the vertical plane. To get the desired movement both hinges need to be adjusted by the same amount and in the same direction. If you only adjust one hinge or adjust both but in opposite directions then of course nothing will happen.
Finally the inner screw will move the door towards and away from the cabinet. This is used if the gap at the back of the door is uneven which leads to the door not closing flush top and bottom. You can diagnose the problem in 2 ways check that the gap between door and cabinet at the hinge side is even top to bottom or you can press the other side of the door to detect movement when closed. Be sure that these rubber bumps are fitted. Then adjust 1 or both hinges to correct the twist.
Now it is all very well knowing what each screw does but the instructions don’t help you much to correct a specific situation, so I will run you through how I go about correcting a few specific scenarios. And at the end of the video I will discuss a few reasons why no matter what you do the doors just will just not align properly. I often use a little model of the situation to try and work out which screws will need adjusting to correct the situation.
Step 1. Align your first door so that it hangs parallel to the cabinet in the vertical and horizontal planes. Don’t worry about how it aligns with the other door at this stage. When I am satisfied that my first door is correctly aligned with the cabinet only then do I adjust the second door (if necessary) to line up with my first door.
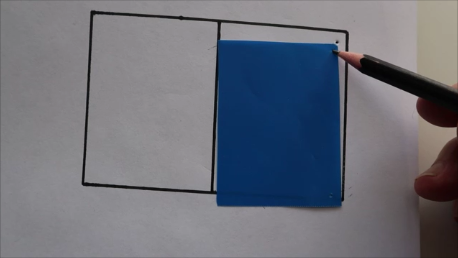
Now let’s run through how to correct a specific problem. First try and diagnose the problem and then imagine how the door would move if you made a certain adjustment. I like to use a piece of card to represent the door and move it to simulate what would happen with each adjustment. Then when I am happy I know what to adjust to correct the problem then I start adjusting very often need to adjust both hinges a bit.
I also check the thickness of the gap between the door and the cabinet at the hinges, looking from the hinge side, the gap should be even all the way from top to bottom. If not then adjust one or both hinges until it has an even gap. This adjustment is done with the screw furthest from the door face. Turn one way to open the gap and the other way to close the gap. I usually establish this by trial and error because the instructions don’t make it clear which way to turn and it can be different for hinges on left or right sides of the cabinet. Then I decide whether I need to adjust one or both hinges.
This is a video demonstration of the process:-
Time stamped key moments in the video
00:00 Beginning
01:16 Which screws to adjust to correct Ikea cabinet door alignment
02:18 Summary of Ikea hinge adjustments
05:06 Aligning door to cabinet first
05:49 Using a model to help align Ikea cabinet doors
06:20 Deciding whether to adjust one or both hinges
06:50 Making the hinge screw adjustments
09:21 How to correct a door rattle
12:17 Reasons why doors will not align correctly
Here some more Ikea kitchen videos:
Comments are most welcome, try this and send us some feedback☺️ Why not visit our channel and browse through our other videos? http://www.youtube.com/c/AnnErasmus
Short Disclaimer/disclosure: My videos/articles are for informational and educational purposes only, you should consult with a professional before attempting anything seen or done in my videos/articles. Please read full disclaimer here: https://basiclowdown.com/disclaimer-disclosure-page/